 HutchBook.com
Bottling Tables
By the late 1880s, the knee bottling process had been replaced by far more efficient and economical bottle filling tables. In his 1888 book A Treatise on Beverages or The Complete Practical Bottler, Charles Sulz noted “The filling-machines may be placed at any convenient distance from the apparatus, the length of pipe only has then to be increased. This connecting-pipe is better throughout of pure block-tin. On American apparatus a flexible rubber hose is attached to connect with the apparatus, which should be of the best kind, compact, and stand the required bottling-pressures; it can be preserved and protected by laying it in melted paraffin of 100° C. (212° F.).” Sulz included an illustration of a bottling table supplied by The Firm of John Matthews in New York. The table was set up for bottling with corks and had a Matthews plunger syrup gauge attached. The parts were labeled as indicated:
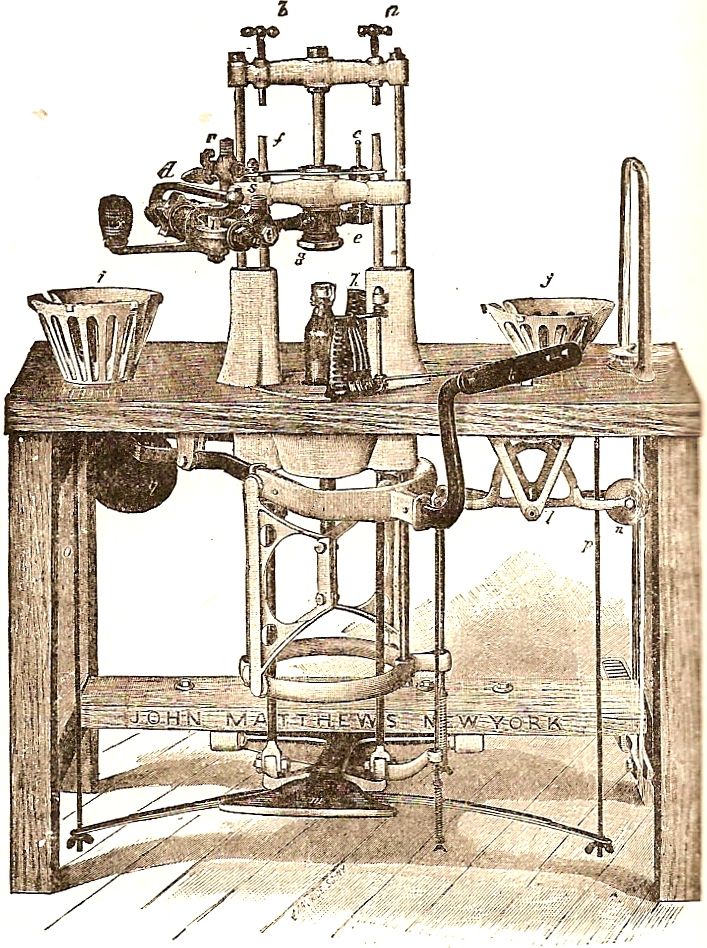
The
description is as follows: a
and b, gauge screws to cork
gauge f, and
d, cork gauge.
This attachment enables all the corks to be driven uniformly and
to the proper depth into the mouth of the bottle.
When the cork is well in, the bottling-cylinder may be raised
sufficiently to allow the cork to be readily secured with the
cork-fastener.
c is an air valve or escape
valve for the atmospheric air in the bottle;
e, cylinder rods;
g, bottling-cylinder with
rubber packing inside; h,
automatic screen; i, quart
pot; j, pint pot;
k, hand lever;
l, walking-beam of the
automatic screen; m, foot
lever; n, balance weight of
the automatic screen; o, and
p, suspension rods of spring;
r, syrup-cock of syrup gauge;
u, cap of water valve of
syrup gauge; x, lever of
syrup gauge; y, balance
weight of hand lever.
James W. Tufts’ 1888 book
The Manufacture and
Bottling of Carbonated Beverages illustrated a bottling
table that Tufts offered for sale, plus highly-detailed directions for
its set up and operation.
Accompanying the following illustrated are selected portions of
Tufts’ descriptions:
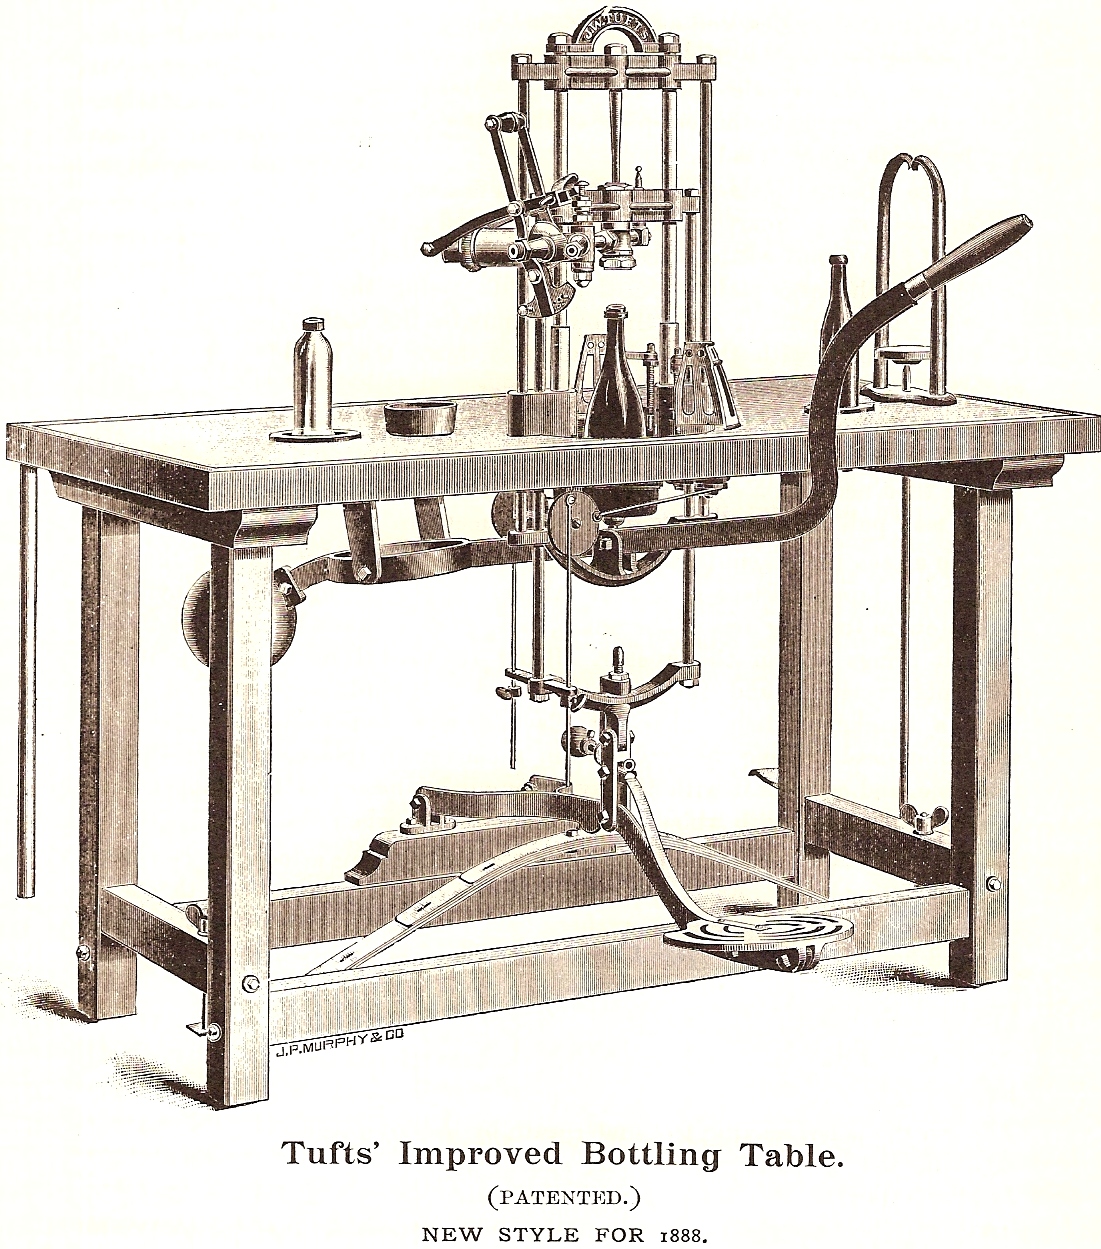
To Set up the
Table.
Place a bottle, of the size for which it is desired to
adjust the shield, in the proper position, – a quart bottle should be
placed in the bottom of the recessed plate pot; for a pint bottle place
the small plate in position; for a half-pint bottle place the large
plate in position, – and placing the foot on the treadle bring the
filling-head or cylinder down firmly on the bottle.
Close the shield around the bottle with the hand, and press down
the hand-lever slightly to enable the springs to catch and hold it in
place…
To attach the patent syrup-pump: Turn back the
check-nut on the long arm of the pump.
Place a leather washer in the filling-head or cylinder, and screw
in the long arm of the pump, using great care not to cross the thread
until it brings up on the washer.
Bring the barrel of the pump into a horizontal position, and turn
up the check-nut hard,
metal against metal with a monkey-wrench.
Do not place a washer between the check-nut and filling-head.
Hang the syrup can in a convenient place, or place it upon the
table, and connect it with the syrup-pump by means of the rubber tube.
A cock is provided with which to shut off the syrup when desired.
If the syrup-gauge is used, instead of the syrup-pump,
attach it by screwing into the filling-head.
As it has no check-nut, it will be necessary to use, on the arm
or in the filling-head, a washer of such thickness that the gauge when
screwed home will stand in the desired position.
The syrup-can must be placed in an elevated position if the
syrup-gauge is used.
Attach the rubber tube from the cylinders or fountains
to the water connection of the pump or gauge.
To Operate the Table.
Place a bottle in position for filling.
Place the foot upon the treadle and bring the filling-head down
firmly upon the bottle, at the same time bringing the cork-gauging pin
into position by placing the toe on the brass strap.
Place a cork, previously well soaked in warm water, evenly in the
top of the filling-head, and with the hand-lever drive it part way
through, using care not to drive it far enough to obstruct the passage
through which the syrup and water are to pass.
Having previously pegged the syrup-pump or gauge, and opened the
cocks which admit the syrup and water, make a backward stroke and draw
the syrup into the pump or gauge.
Then make the necessary forward stroke, throwing the syrup into
the bottle and opening the water-valve.
The air in the bottle should escape through the air-valve on the
further side of the filling-head, which may be adjusted by means of its
cup.
As soon as the bottle is sufficiently filled, make a
backward stroke with the pump, thereby shutting off the water and
drawing syrup for the next bottle, and drive the cork by a downward
stroke of the hand-lever.
Release the cork-gauge by raising the toe slightly from the brass strap,
still holding the filling-head down firmly on the bottle with the foot,
and raise the hand-lever a trifle to allow the pin to drop back out of
the way. Now let up on the
treadle, (still holding the handle-lever down firmly to retain the cork
in the bottle) which will permit the filling-head to rise from the
bottle sufficiently to allow the wire-fastener to be turned up over the
cork, or the bottle and cork to be seized with the corking-tongs if
desired to wire it. The
hand-lever may now be released, and when it has risen to its highest
point it will disengage the springs which hold the safety-shield, and
the shield will fly open.
The bottle can now be removed, and if to be wired, is taken to the tyer
where it is held while the wire is attached and fastened.
Keep the working parts of the table well oiled and
free from rust. Connections
are provided on the pot of the recessed-plate, on the air-valve, and on
one corner of the table, to which drain-pipes can be attached, for the
purpose of removing waste-water and keeping the table and operator dry.
The table should be so placed that the waste-water will run
toward the corner which is provided with the drain connection.
The cork-gauging attachment is a new improvement –
patent applied for – which takes the place of the wheel on the
cork-plunger, and which enables the operator to drive every cork exactly
the same distance into the bottles, no matter how they may vary in
height. But little practice
is required to enable the bottler to work rapidly with it, and it will
be found a great improvement and convenience.
The pin can be adjusted, by loosening the check-nut and screwing
the pin either up or down as desired.
As Tufts’ set up and operating descriptions indicate,
early bottling tables weren’t much more than corking benches.
A valve regulated the flow of carbonated water, a foot treadle
brought the filling head down onto the bottles, and a hand lever used a
pin to drive corks into the mouth of bottles after filling.
Higher end models included an automatic snifting valve and a
small safety screen encasing the bottle for protection in the event of
an explosion.
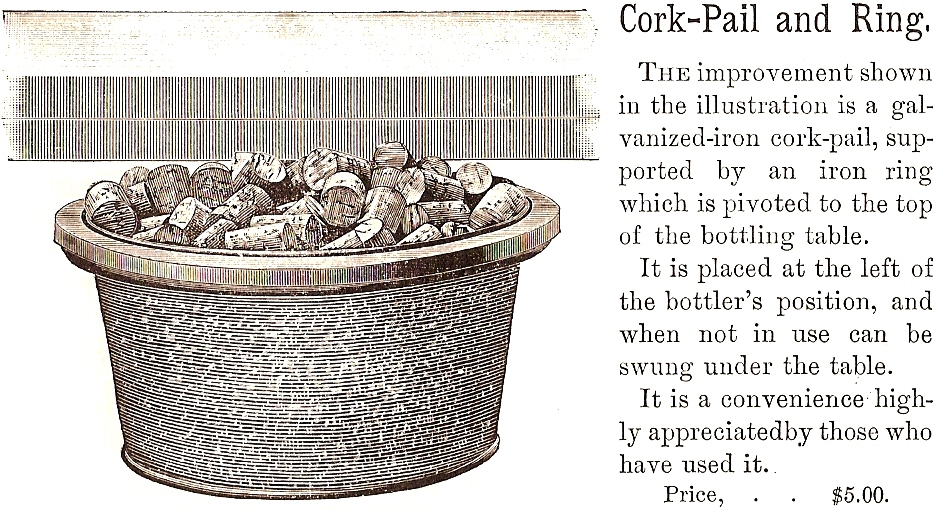
One of the options Tufts offered was this cork-pail: